Do you have Facebook and Instagram profiles for your business? Then, Meta Business Suite should be one of the essential things in your tool kit.
If you are wondering “What is Meta Business Suite,” and “how to use Meta Business Suite,” this guide is the perfect answer.

What is Meta Business Suite?
Meta Business Suite is a mobile and desktop application that connects your FaceBook and Instagram business accounts. It is a centralized hub for Meta users to manage posts, advertisements, and communications across Facebook, Instagram, and Messenger. And it provides tools to monitor content performance.
Instead of juggling multiple tools for creativity, analytics tracking, and publishing, you can streamline all these tasks using the Meta Business Suite.
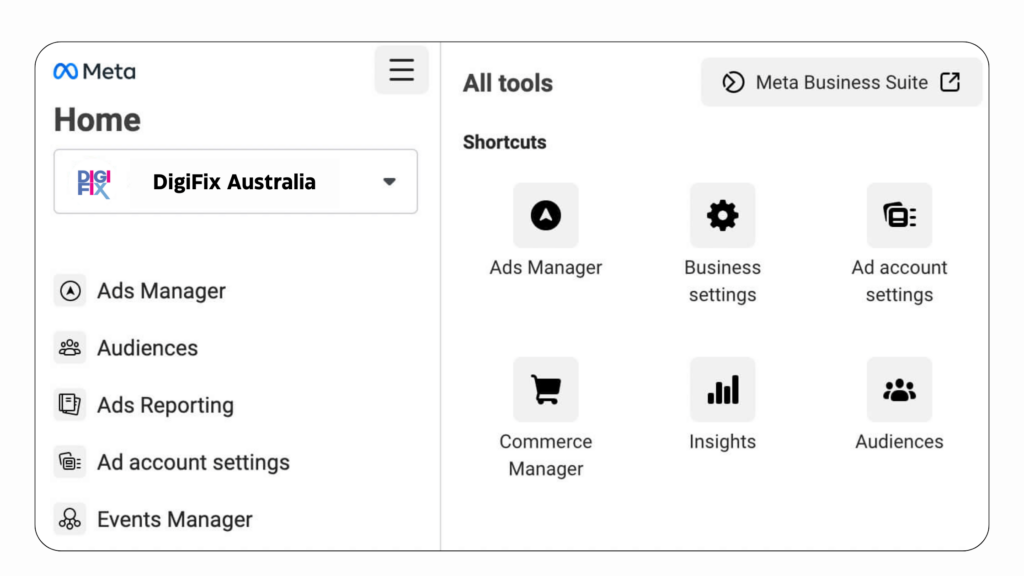
Is Meta Business Suite different from Facebook (Meta) Business Manager?
That’s right, FaceBook Business Manager (Meta Business manager) and Meta Business Suite are two different tools.
In summary, if you expect a centralized tool for posting and engaging with your community on Facebook and Instagram, Meta Business Suite is the way to go.
On the other hand, if you’re running ad campaigns and need greater control over your business settings with enhanced security measures, Meta Business Manager is your solution.
Meta Business Suite has numerous community management features such as post scheduling, publishing, responding to comments, and managing messages on Facebook and Instagram.
Meta Business Manager provides more advanced functionalities including, ad creation, billing, tracking, and asset management. When you try to create an ad within the Business Suite, you’ll be directed to the Ad Manager.
Who can use Meta Business Manager?
Few types of people can get massive benefits from the business suite.
Social Media Manager of a brand: If you are a social media manager or part of a marketing team at a business, Meta Business Manager is the essential tool you need. It allows multiple team members to access and manage your Facebook or Instagram business pages easily.
Business Owners: In addition to helping you organize and manage your business, Meta Business Manager helps keep your brand separate from your personal account. Your audience won’t see your personal Facebook information; instead, they will only associate your brand with the information you choose to share, such as your name, work email, Pages, and ad accounts.
Someone who manages multiple Instagram and Facebook pages: If you manage multiple Facebook or Instagram assets such as Facebook Pages, ad accounts, or apps for your business, using a central platform helps keep everything organized.
Benefits of using Meta Business Suite
Meta Business Suite offers several significant advantages that simplify your social media management:
Centralized social media management: Managing multiple social media accounts can be a hassle. Meta Business Suite centralizes your business activities across Facebook, Instagram, and Messenger, making it easier to handle everything in one place.
Connecting to third-party tools: To use social media management tools such as Sprout Social, you’ll need Meta Business Suite to link your accounts.
Provide Social media insights: Meta Business Suite provides valuable data on the performance of your ads, audience engagement, and the demographics of those interacting with your business pages.
Post scheduling and content planning: Create, schedule, and publish content in advance across your Meta business channels efficiently.
Prioritized notifications: It highlights the High-priority interactions like comments and messages in your Notifications tab, helping you to respond quickly.
Inbox management: Meta Business Suite consolidates all your messages from Facebook and Instagram accounts into one inbox and uses automation to help you organize messages and comments efficiently.
How to add Facebook Pages to Meta Business Suite
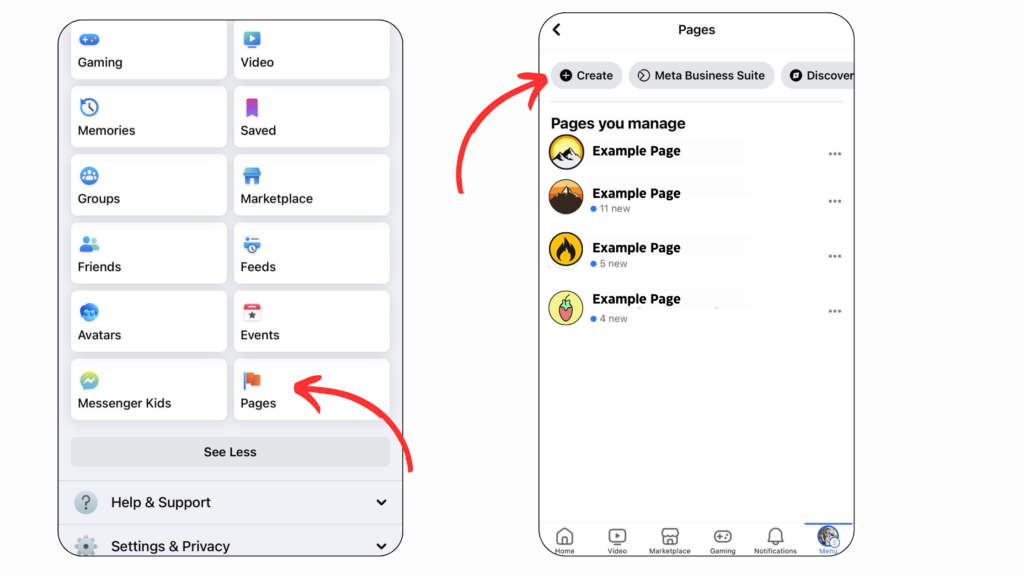
1.Creating a Facebook page for your business
You need a Facebook business page to connect with Meta Business Suite. If you already have one, you can skip this step. If not, here is how to create a Facebook business page:
If you don’t have a personal Facebook account, you can create one first. Then follow the below steps.
In the left-hand menu, look for the Pages tab and click on it.

Click the “Create New Page” button.
Fill out your business name, category, and a brief description. Add additional information such as location, contact details, and business hours.
Upload a profile picture and a cover photo that represents your business.
Once you filled in all the necessary information, click the “Create Page” button to publish your business page.
2.Download the Meta Business Suite App or Access the Platform on the Desktop.
To get started with Meta Business Suite, visit the platform on your desktop or download and open the app on iOS or Android.
Follow the onscreen instructions to log in or set up a new account.
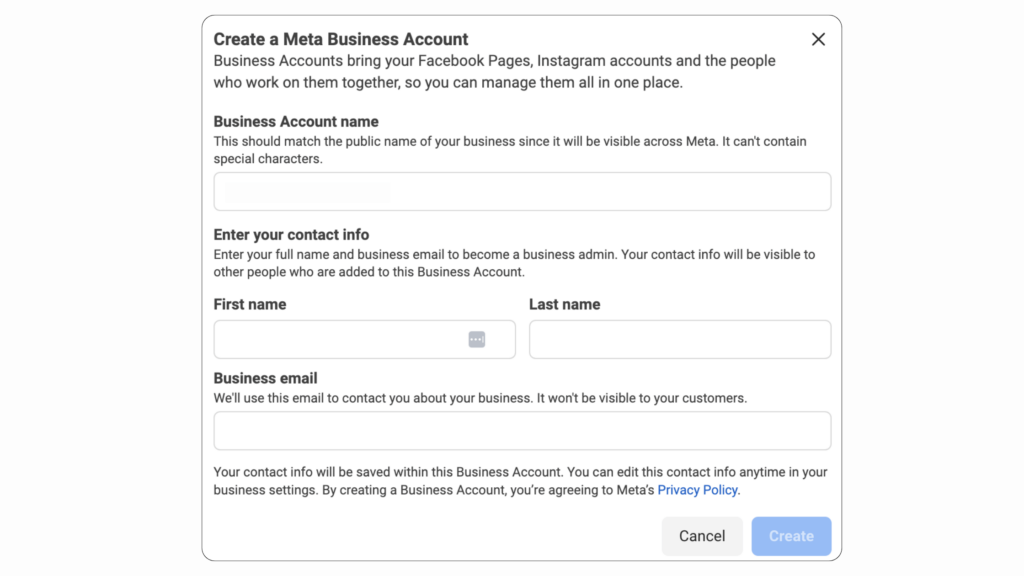
In the upper left corner, find the dropdown menu.
Click the “+Create a business account” button and follow the onscreen steps.

You can connect your account on your desktop or through the mobile app. In many cases, Meta may automatically connect your Facebook business page to your Meta Business Suite account.
How to add Instagram accounts to Meta Business Suite
Follow these steps to connect an Instagram account to your Business Suite:
- Open the Meta Business Suite desktop app and click Settings from the left sidebar.
- Then click Business Assets.
- Click Add Assets and then select Instagram account.
- Read and agree to Meta’s terms for linking your Instagram account, and click Claim Instagram account.
- Enter your Instagram username and password, and click Log In.
- Meta will ask you to add a security code if you have Two-Factor Authentication.
- Finally Click Confirm.
Once you add your Instagram account, you will receive a confirmation message showing that it’s connected. You may also need to log in to Instagram again to modify your account management and access settings.
How to Use the Meta Business Suite?
Once you’ve connected your Facebook and Instagram accounts to Meta Business Suite, there are a few additional steps to complete your setup and get started:
Connect and manage your ad accounts
- Follow these steps to add an ad account in Business Suite:
- Go to Settings.
- In the left-side menu, click on “Accounts” and then select “Ad Accounts.”
- Click the blue Add Ad Accounts button.
- Select one of the three options: Add an ad account, Request access to an ad account, or Create a new ad account.
- If you request access or add an ad account, enter the ad account ID. Follow the prompts to select people and access levels.
Add basic information about your business
To edit your organization’s information in Meta Business Suite:
- Navigate to the Settings section.
- In the settings menu, select “Business Account Info.”
- On the right side of the page, you will see the “Edit” buttons next to different information categories. Click these buttons to update details such as your business name, primary page, legal business name, address, business phone number, and website.
- After making your edits, click the “Save” button to save your changes.
- If you update your email address, you will need to confirm the change via the confirmation email sent to you. If you don’t see the email, check your spam folder. To resend the confirmation email, go to “My Info” and click “Resend email.”
- By following these steps, you can easily update and manage your business information in Meta Business Suite.
Create and schedule a post using Meta Business Suite:
Let’s see how to use Facebook (Meta) Business Suite to schedule posts and Stories.
- Open Meta Business Suite from your desktop.
- Select Content or Planner. You can also select Home.
- Click the Create post button.
- Select where to schedule a post: Facebook Feed, Instagram Feed, or you can select both.
- Add your post details, including text, media, and an optional link and location.
- Add an optional Feeling or Activity to your post to express a mood or action, making your post more engaging.
- Include a location in your post to help target a specific audience and make your content more relevant to your followers.
- Add a Messages button to your post to encourage direct communication from your audience.
- Include a link to direct users to a specific website or page.
- For Facebook posts, you can run an A/B test to compare different versions of your content. It helps you determine which variation performs better with your audience.
- (Optional) To publish the post later, click Schedule.
When scheduling a post in Meta Business Suite, you can choose your privacy settings and decide whether you want the post to be Public or Restricted.
Preview your post on the right side. You can compare how it will appear on Facebook versus Instagram and see how it looks on desktop versus mobile.
Select whether you want to Boost the post, which will create an ad with the post.
Click Publish.
Create or schedule a Story:
Click the post-creation tool to create a new Story.
You can add media such as pictures and videos to your post. You also have the option to select multiple images simultaneously. Additionally, you can include text, stickers, GIFs, and more. You can reposition and resize these elements on your screen as desired.
Tap Share On.
Select the placement of your Story. You can select your Facebook Page, Instagram account, or both.
Select an option:
- To publish your Story immediately, tap Share.
- To schedule your Story to publish later, tap Schedule for later.
- Select the date and time.
Click Done.
Click Schedule to finish.
Add users in Meta Business Suite
To add users to Meta Business Suite:
- Go to Settings.
- In the People tab, click the Add people option.
- Enter the email address of the person you want to add and click Next.
- Select the type of access you want to assign. Click Next.
- Select the asset you want to assign and choose the type of access. If assigning partial access, select the task they need for their job. Click Next.
- Check the invitation and click Send request.
- The person will receive an invitation to join your Business Account via email.
Set user permissions
To set user permissions:
- Go to Settings in Meta Business Suite.
- Under Users, click People.
- Choose the name of the person whose access you want to change.
- Under Business Account access, select Manage.
- Make your changes in the permissions.
Remove users from the Meta Business Suite
To remove users:
- Go to Settings.
- From the People tab, select the person you want to remove.
- Click the three horizontal dots icon. Select Remove from Business Account.
Confirm you want to remove that person. Click Remove.
Frequently asked questions about Meta Business Suite:
Q1: How do I contact Meta support?
First, visit the [Meta Business Help Center], where you can search for specific questions or issues, or browse through their suggested troubleshooting topics.
If you still need assistance, follow these steps:
- Open Meta Business Suite
- Click the Help button at the bottom left of your screen.
- The help window will open on the right side of the screen.
- Scroll down the help window until you find the “Contact Support” button.
- From there, you can get in touch with Meta support for further help.
Q2: What do I do if someone hacks my account?
If you suspect someone hacked your account, follow these steps:
- Access your Accounts Center through your Facebook profile.
- Go to “Password and Security” under Account settings, then select ‘Where you’re logged in’ under Security checks.
- Review the list of devices where your account is currently logged in and log out of any devices you don’t recognize.
- Change your password to secure your account.
- Enable two-factor authentication to add an extra layer of security and prevent future security breaches.
If you can’t access your account at all, reach out to Meta Support for further assistance.
🌟 Elevate Your Social Media Presence with DigiFix! 🚀
Are you ready to take your brand’s social media game to the next level? Look no further than DigiFix, your ultimate partner in digital success! 🌟
At DigiFix, we specialize in preparing tailored social media solutions designed to boost your online presence and drive meaningful engagement. Our social media management services include:
✨ Setting up social media accounts: We’ll build a captivating online presence for your brand across various platforms, ensuring a seamless and professional image from the get-go.
✨ Meta Business Manager account setup: Let us streamline your social media management with Meta Business Manager, empowering you with efficient control over your Facebook and Instagram assets.
✨ Research and research: Our expert social media team will create compelling and relevant content that resonates with your target audience, sparking conversations and fostering connections.
✨ Social media ads management: Maximize your reach and ROI with our strategic ad campaigns tailored to your unique objectives and audience segments.
And that’s not all! We go the extra mile by providing comprehensive weekly and monthly reports, giving you valuable insights into your social media performance and guiding future strategies for success. 📊💼
Ready to transform your social media presence? Contact us today for a free consultation, and let’s embark on a journey to digital greatness together! ✨📱
Do you want more traffic?
—————
Hi, we are an Australian digital agency doing groundbreaking work to help a business like yours reach its full potential. My only question is will you qualify for our services?
Do you want more traffic?
—————
Hi, we are an Australian digital agency doing groundbreaking work to help a business like yours reach its full potential. My only question is will you qualify for our services?


 Hi, we are an Australian digital agency doing groundbreaking work to help a business like yours reach its full potential. My only question is will you qualify for our services?